She has done an excellent job of breaking down different aspects and functions of Google Sites into an easy to read and follow format.
The site (created on Google sites of course) includes getting started, the basics, editing, inserting gadgets, using layouts and templates, and much more. She has video tutorials, links, and examples of sites and also has a section specifically for educators.
If you use Google Sites or want to create your own web site using Google Sites, I highly recommend this. It is also a great resource for students to create student portfolios on Google Sites.
What can Google Sites Do for You? Check out this presentation to see the different areas in which you can apply Google Sites in your classroom.
Let's Get Started:
Log in to your school email account and find Sites located at the top of the bar.
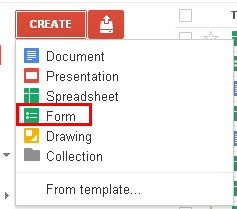
Here we'll learn by example. Here is an example on the use of Google Form First click on Drive 1. Click on the Create button on the top left section of the page. Click on form.
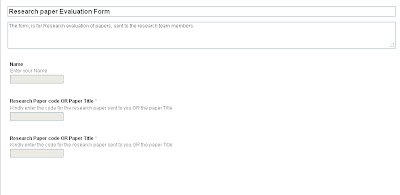
2. You will be redirected to a screen, whose portion looks like this.
In the Question Title, Write down the question which you would like to ask. In the Help Text, Write down some text, which would be helpful in understanding the question. The third Option, i.e. Question type gives you a variety of options to choose from, Ranging from text, multiple choice, Check boxes etc. 3. After you've entered a few questions, and you're happy about it. The form will look like this
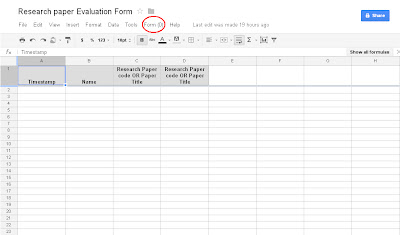
4. Once this is over, chose a theme from the top left corner. The answers to your form sent over to your students or colleagues, will be stored in a Google spreadsheet, which may look like this.
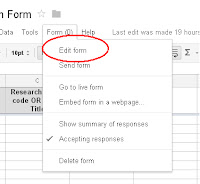
5. Again if you are not sure with the final result, you can always come back and edit your form.
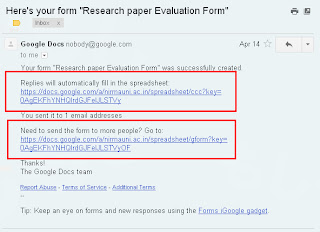
6. Once everything is finalized, You will receive a link to your form, from Google.
So you don't have to worry, where did your form go, after you've closed your browser.
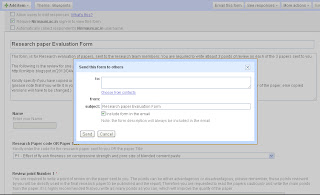
From there you may select some recipients to your form. Just type in their email addresses and click on send.
If you are still unclear at some point, Here is a Video depicting the previous steps, with helpful subtitles.
If you would like to check out some pre-made google forms be sure to look at these sites: 80 + Google Forms idea in the classroom: This website is has created examples forms for each of the different topics, follow the links in each of the sections to view the forms. 74 interesting ways to Use Google Forms in the Classroom: Check out the interesting ways of resources to continue to grow and add resources to your classroom.
Many of the Howard-Winneshiek Staff were inspired with the story of Caine’s Arcade blasted into the mainstream. If you haven’t watched the original, stop reading this and go watch it!
To celebrate the one year anniversary of the flash mob they hosted for Caine, they are organizing a Global Cardboard Challenge. Hundreds of people are hosting play parties where kids can get together and MAKE with cardboard. It’s about creativity, fun and more than anything, play.
Take a look at the followup video to Caine’s Arcade.
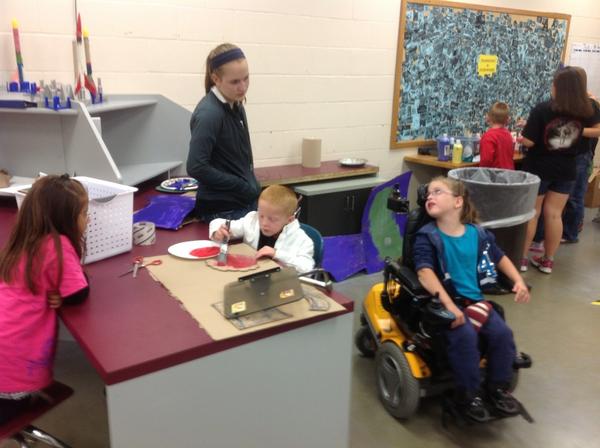
Just as Caine's story has been an inspiration to our staff and students they have been creating there Cardboard project.
Cardboard Pile
Take a look at their before projects: As the projects are underway here is the pile of Cardboard the students used to create there imagination projects.
Teamwork as the Kindergarten and 7th Graders work together to create there cardboard challenge.
When I mention Dropbox to friends and colleagues, I usually get one of two responses – a knowing smile and nod, or a puzzled and quizzical look. Whether you know what the program is, you have likely heard the name. But really, what is Dropbox?
Dropbox is many things — a tool that’s so powerful, you’ll continue to discover new ways to use it. You can use it to store and sync documents and files across computers, tablets, and smart phones. I can write a lesson plan on my computer at home, put it in my Dropbox folder, and whoosh – it’s synced with my school computer. During a free period at school, I can open that file, make a few changes, and the changes are automatically synced with my home computer. It’s seamless, fast and free.
How Dropbox works
So, how can you use Dropbox as an educator? There are many ways that you can do this. One is to just manage your own material and make it more accessible. Additionally, many applications that you likely use (Evernote, iPad camera roll,iPhoto to name a few) have a Dropbox sync option. Check your favorite applications to see if they have a “save to Dropbox” feature. Since Dropbox works across platforms and devices, you can use a Mac at home, a Blackberry phone and an iPad, and you will have access to your documents on *all* of them. Thanks to Dropbox’s syncing magic, your documents will be up to date at all times on all devices.
Using Dropbox with students
In addition to making your life a lot easier, Dropbox can be a great teaching/learning tool – and this is why its introduced to staff and students. The first thing to do is to create a sharing folder for each class you teach so you can make information available to your students (PowerPoints, hand-outs, reading assignments, whatever).
You can call this folder anything. For mine Tech Time, consider adding the word “share” and create folders with names like “Tech Time Share Folder.” When you go to your Dropbox page on the web, this screenshot gives you some idea of what you will see.
Next Step: Put your mouse over the folder and right-click on the folder - a drop down menu will appear. Select "Invite to Folder."
Next, you will get the window shown below. Input the email address of your students/staff (this will also invite them to join Dropbox, giving you and them the free 250 MB). You can also input a message like: "Accept this invitation to have access to our material for class."
Once you have invited students this becomes a "Shared Folder." Whoever has access to this folder (everyone who has been invited an accepted the invitation) can add files, download content, and (whether you like it or not) delete content. However, only *you* (as the owner of the folder) can delete or edit out content permanently. Click on the folder in Dropbox and then on "Show Deleted Files."
How do I employ Dropbox in my classroom?
Dropbox can be used in a number of ways. Here are several:
To store additional copies of hand-outs. Students know to re-download and print on their own here if they missed a hand-out due to an absence or simply lost it.
To distribute PowerPoint presentations – if they are too large for email or edmodo.
As a way for students to turn in homework assignments. It’s an easy electronic homework drop and will time stamp submissions.
Dropbox can also be a useful tool in managing student projects and presentations. With Dropbox, you can visually determine that students have completed a particular portion of a project or presentation assignment. Best of all, since all presentations are “turned in” to same virtual place, every student can access his or her presentation by one log-in.
Students catch on quickly
They can store homework assignments there for easy access, pictures, and videos. Students can use Dropbox on their phones to review handouts (rather than a print-out, ultimately saving paper). And many of them can sync their files across multiple computers outside of school.
This isn’t a program you will have to teach your students to use. Don’t be surprised if in a few weeks, they’re showing you some tricks you haven’t even considered. That’s something I would encourage.
Educating young minds was something that came naturally to me. Every moment in our lives has been a teachable moment and every story read a springboard to new height. I had to become a teacher! This has lead into the passion for educating staff and students in technology.







 Posts
Posts


